Clean office-chair arm pads by first identifying the pad material and deciding whether the sticky feeling comes from removable residue or a deteriorating surface. A gentle approved cleaning can remove soil. It cannot restore a peeling coating, rebuild a split pad, or reverse material breakdown. Those conditions call for replacement assessment rather than a stronger cleaner.
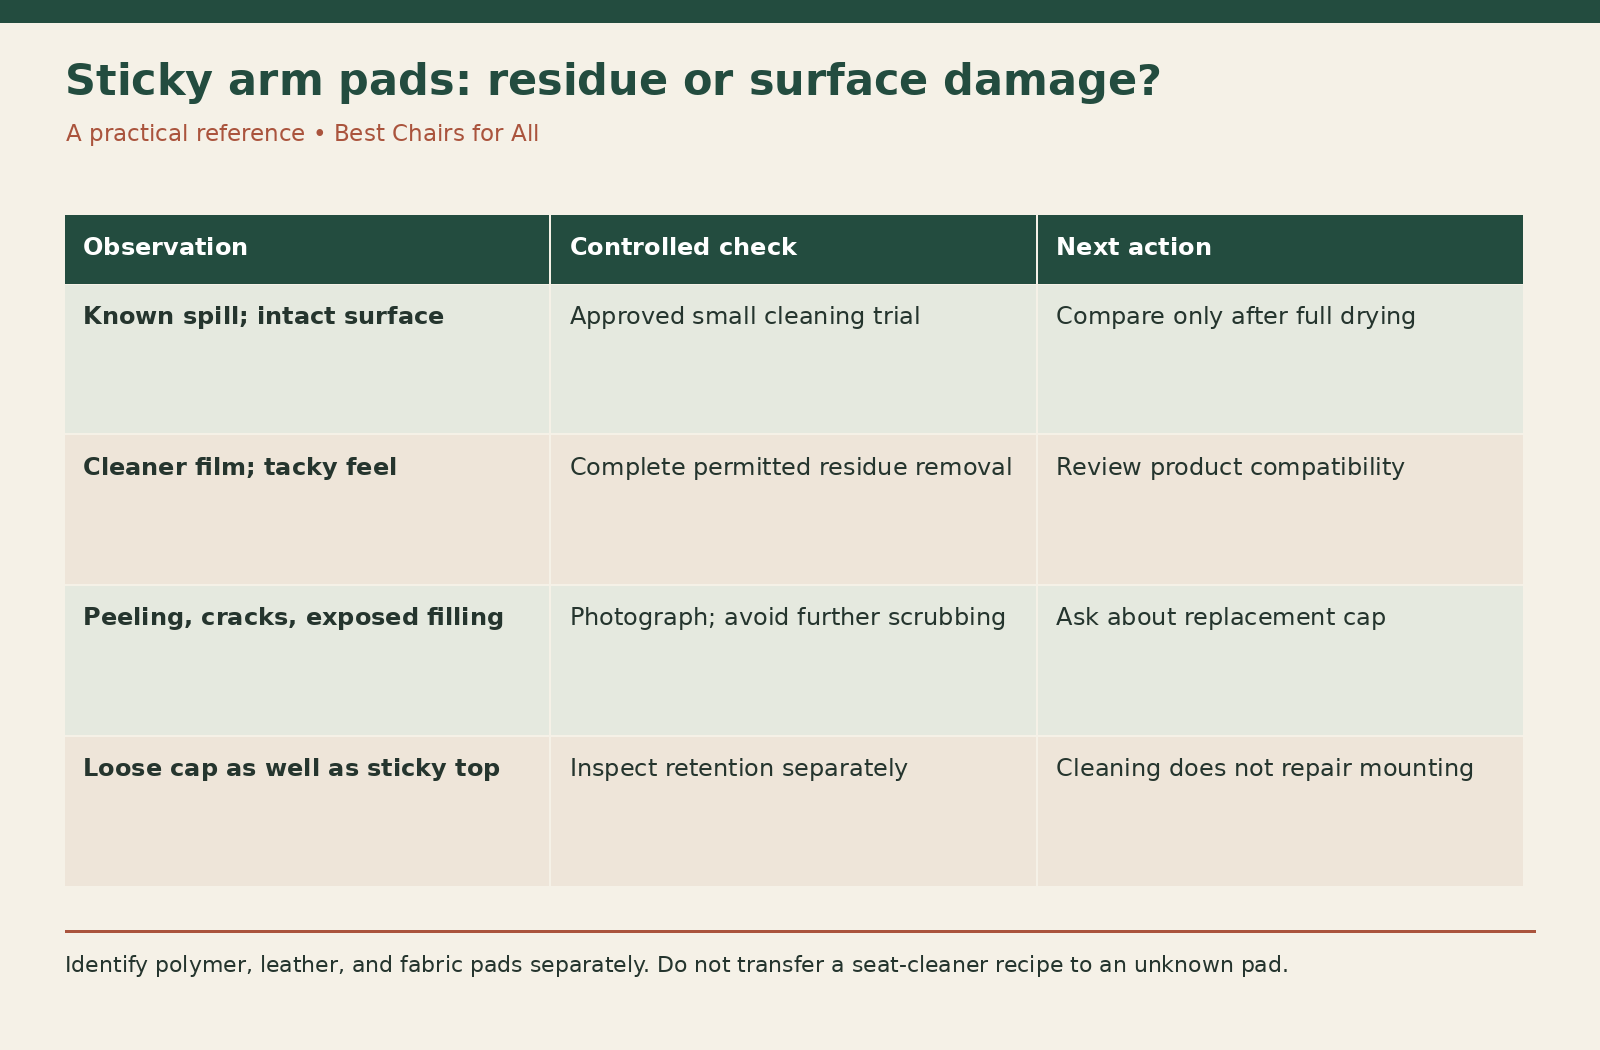
Arm pads are handled frequently and sit close to adjustment gaps, so controlled application matters. Use the specific care instructions for the installed pad, including any aftermarket replacement. The residue-versus-wear diagnostic below helps you avoid polishing a damaged surface or carrying hard-surface cleaning advice onto leather or fabric.
Identify the actual pad material
Check the chair specification, purchase record, or replacement-part description. Possible coverings include molded polymer, coated foam, synthetic upholstery, leather, or fabric. The underlying chair model does not always identify the pad because manufacturers may offer several options.
Do not assume the pad matches the seat. A leather chair can have polymer pads, and a mesh chair may offer leather arm pads. A secondhand chair may have replacement caps that look close to the originals but use a different covering. Ask the supplier for the applicable care guide if the history is unclear.
Record the pad and its care source separately from the seat and back. This simple distinction prevents a cleaner approved for a plastic base from being applied to an absorbent or coated contact surface. Appearance and color are poor substitutes for documented material identity.
Look for evidence of residue
Ask what has recently touched the pads: hand lotion, food, adhesive, cleaning wipes, or another product. A known spill or new cleaning routine helps explain a surface deposit. Photograph the pad before treatment and note whether the condition is uniform or concentrated where an arm rests.
Look for a film that can be removed under the approved method, but do not scrape the surface to test it. A rough tool can turn a small sticky patch into visible damage. The first diagnostic step is a gentle documented clean on a small inconspicuous area, followed by full drying and comparison.
If you do not know what caused the mark, keep that uncertainty in the record. Dark transfer on a cloth can be dirt, dye, or degraded material, and color alone does not distinguish them. Stop if cleaning visibly removes the finish or exposes a different layer.
Look for evidence of wear or deterioration
Inspect for flaking, fine cracks, exposed filling, a split seam, or a coating lifting from its backing. These are material conditions that cleaning cannot reverse. A pad can remain securely attached while its contact surface needs replacement.
A sticky feel that persists after the approved method and full drying deserves a material assessment. Do not automatically label it a particular chemical failure based on an online description. Ask the manufacturer whether the observed surface is compatible with further cleaning or should be replaced.
Also examine the underside attachment. A loose cap and a sticky cap can occur together but require separate actions. Cleanliness does not establish retention, and a new surface cover will not secure a cracked mounting. Our loose-armrest guide covers the mechanical distinction.
Compare two documented routine-cleaning methods
The Humanscale seating-cleaning instructions give arm pads and bases their own short routine: mild soap and water, gentle wiping with a soft cloth, and drying. Its later leather and textile sections are separate, so a treatment listed for a particular textile should not automatically migrate into the arm-pad routine.
The Herman Miller Aeron care guide groups the relevant base, frame, and arm-pad surfaces and describes mild detergent with a soft cloth, rinsing, and drying; it warns against solvents and abrasive kitchen cleaners. Check the guide’s applicability if your Aeron has a different pad covering.
These examples support a modest routine within their material scope. They do not justify a universal solvent, bleach, or alcohol wipe for all pads. Follow the specific installed material and ask about a compatible alternative if your cleaning environment requires a product not addressed in the guide.
Prepare a controlled cleaning trial
Use clean soft white cloths, the approved product, and a protected work area. Keep the chair stable and the pad accessible without resting the chair on its controls. Do not remove the cap unless the applicable instructions support doing so and there is a useful reason.
Choose a small inconspicuous test location permitted by the guide. Apply the cleaner as directed and keep liquid away from adjustment slots and seams. Avoid spraying the assembly from above; it is easy to send liquid past the pad into the carrier below.
Use separate cloths for cleaning, permitted residue removal, and drying. A cloth previously used on the caster or base can introduce grit to the pad. Keep any abrasive sponge or brush out of the routine unless the exact material instructions require it.
Judge the trial only after drying
A damp pad can feel different from a dry one, and residual cleaner can create its own tackiness. Complete the specified rinse or wipe step, dry as directed, and let the test area settle before comparing its feel and appearance with the untreated area.
If the test is unchanged and the surface remains intact, proceed only within the supported method. If it improves, clean the appropriate remaining area gently. Do not repeatedly concentrate on the same small spot while the surrounding pad still contains the original residue.
If color, texture, or coating changes unexpectedly, stop. Record the product, dilution if used, application duration, and observed result. That information gives support a concrete starting point and prevents a later cleaner from unknowingly layering another product onto the changed surface.
Keep leather and fabric pads on their own route
A leather pad needs the relevant leather-finish instructions, and an upholstered fabric pad needs its textile care guidance. Mild cleaning for a molded pad cannot be assumed suitable for either. Check whether the maker wants treatment over a whole panel rather than a concentrated spot.
For fabric, identify the actual textile code and avoid saturating the hidden pad filling. For leather, avoid unapproved oils, polishes, or conditioners simply because a surface feels dry or sticky. Those treatments can change a finish and do not establish what caused the original condition.
Our leather-care guide and fabric-care guide explain those identification steps. Use them to find the appropriate route, then return to the arm pad’s own instructions. Do not combine the strongest stain-removal suggestions from several materials into one experiment.
Do not confuse cleaning with disinfection
A material-compatible cleaner and a disinfectant answer different questions. If a workplace requires disinfection, confirm that the specific pad material accepts the product and that the product’s own instructions can be followed. Do not assume that a wipe used on the desk is suitable on every chair surface.
Avoid compensating for uncertainty with longer contact time or repeated applications. Both the pad compatibility and the cleaner label matter. Where those requirements cannot be satisfied together, ask the manufacturer and workplace facilities staff about a supported material or process.
Never mix cleaners or try to neutralize one with another household chemical. For routine dirt, an approved simple cleaning method is often the relevant task. Fragranced spray or polish can leave another film without addressing the actual soil or worn surface.
Use the residue-versus-wear worksheet
Make six fields: pad material; source of care instructions; known contact history; visible surface condition; dried trial result; and next action. Keep the two pads as separate rows if they have different conditions. Add photographs showing the original and dried test area.
A hypothetical residue case might read “documented polymer pad; approved soap method; recent lotion spill; intact surface; dried trial clean and unchanged; finish routine cleaning.” A wear case might read “coated pad; unknown earlier cleaner; peeling edge; trial stopped when finish transferred; contact maker for replacement.”
The worksheet does not identify a chemical diagnosis. It organizes evidence that supports either continued approved care or a part-replacement discussion. This prevents the common escalation from mild soap to solvent to abrasive scraping when the surface itself is no longer intact.
Consider replacement at the component level
If the pad is damaged, check whether the manufacturer sells the cap separately from the complete arm. Haworth’s replacement arm-cap page lists supported chair and arm applications and directs owners to model-code information. That is a useful example of restoring the contact component without assuming the entire chair must be discarded.
Confirm the exact chair, arm type, left/right requirement, supplied hardware, and installation instructions. Do not buy only by pad length or color. The underside carrier and fastening pattern can matter more than the visible top shape.
If a cap cannot be replaced separately, ask about the complete compatible assembly and installation cost. Avoid wrapping peeling material with tape or using adhesive patches that hide an insecure edge. Any optional cover should follow a confirmed sound underlying pad and mounting, not substitute for their repair.
Adjust the routine to the actual cause
If lotion residue is recurring, allow products to absorb before resting arms and use the supported cleaning routine when needed. If repeated chemical wiping preceded a changed finish, review the products with the manufacturer. Do not keep using an incompatible process simply because the pads are high-touch surfaces.
Check desk contact too. A pad that repeatedly scrapes an apron may show localized wear that cleaning cannot fix. Adjust its documented position and desk clearance after confirming the arm is mechanically sound. A replacement pad will wear in the same contact location if the surrounding fit remains unchanged.
A finished pad should be clean, dry, intact, and securely retained, with its adjustment still working normally. Keep the material identity and successful method with the chair’s records. That lets the next maintenance decision begin with evidence rather than another guess about what a sticky surface needs.
Something unclear or out of date? Send a correction with this article’s title and the detail to check.
Sources, research & corrections policy ↗