Clean a mesh office chair by identifying the mesh and its care instructions, removing loose dirt, and treating only the remaining soil with the approved method. Keep liquid out of the foam, controls, and mechanism below the seat. A mesh surface may look like a washable screen, but the finished chair is an assembly with several materials and limited access for drying.
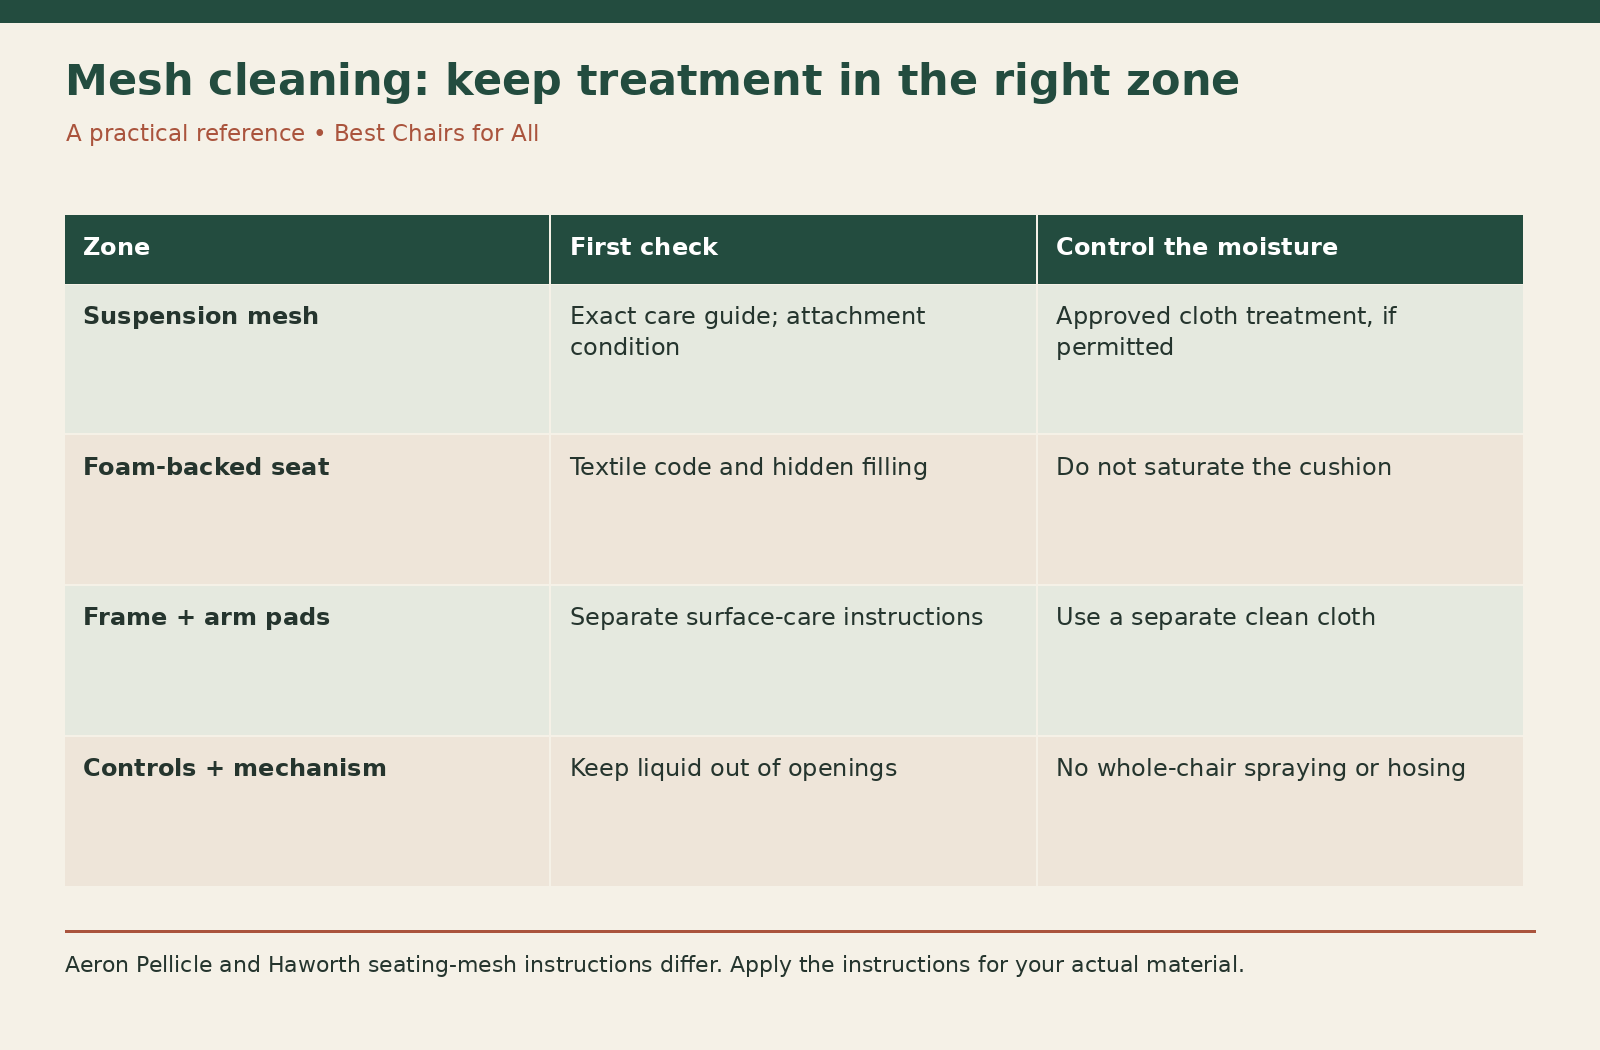
The safest useful starting point is usually gentle dry removal of dust with an appropriate upholstery attachment. The next step depends on the actual chair. This guide compares documented manufacturer instructions and gives you a zone-by-zone cleaning plan, rather than suggesting that every mesh chair should be scrubbed or washed outdoors.
Identify what you are cleaning
A chair advertised as mesh can have a suspended mesh seat, a mesh back over a support structure, or a mesh-looking textile stretched over foam. Inspect the underside without dismantling the chair. A padded seat behaves differently from open suspension because liquid can enter filling that you cannot see.
Find the model label and obtain the manufacturer’s material guide. If the chair has been reupholstered, the original guide may no longer identify its current covering. Ask the seller or upholsterer which material was installed. A similar weave or matching color is insufficient to establish the same care method.
Make a simple material map: back mesh, seat mesh or fabric, frame, arm pads, and controls. Give each area its own approved treatment. The plastic frame may tolerate a damp wipe while the adjacent textile needs a more limited method. Do not spray the entire chair just because one surface is described as washable.
Read the manufacturer examples as separate instructions
The Herman Miller Aeron care guide specifies upholstery-attachment vacuuming for 8Z Pellicle and warns against brushing or rotary-brush attachments. Its stain instructions distinguish water-based spots from other marks. Those details matter; replacing the vacuum tool with a stiff brush changes the method.
By comparison, Haworth’s care and maintenance guide describes supporting seating mesh from behind with a clean towel while gently applying the specified solution and removing residue. It cautions against heavy-bristle brushes and excessive heat. That is a documented supported-cleaning approach for the materials within that guide’s scope.
These examples show why a universal recipe is unreliable. Do not transfer Haworth’s detergent concentration to another brand or treat Aeron’s instructions as permission to clean every mesh the same way. Use the applicable current guide and resolve uncertainty with the manufacturer before a wet treatment.
Set up a controlled work area
Place the chair on a protected surface where it can remain until dry. Keep cleaning cloths away from gritty caster treads so you do not carry floor debris onto the mesh. Gather a clean upholstery vacuum attachment, white absorbent cloths, and only the cleaning product allowed for your identified material.
Keep a separate cloth for plastic and metal. Dirt removed from a base can stain a pale seat, and a frame cleaner can leave a different residue from an approved textile product. If the chair includes electrical accessories, disconnect them according to their instructions and avoid introducing liquid near their connections.
Photograph the stain before starting and note what caused it if known. The distinction between a fresh beverage spill, an oily mark, and a broad gray dust film can change the decision. Do not classify an unknown dark patch as mold or grease from its appearance alone. When contamination is extensive or uncertain, ask for professional assessment.
Remove dry debris first
Use the upholstery tool lightly over accessible mesh, seams, and the junction with the frame. Work in a consistent direction so you can see which areas are complete. Avoid pressing so firmly that the attachment stretches the mesh or catches a damaged edge. Do not use the vacuum to pull loose fibers back into place.
Where the guide prohibits brushing, that includes substituting a powered upholstery brush for an ordinary upholstery nozzle. An attachment that works well on a sofa may be unsuitable for a chair’s suspension material. Check the actual tool rather than relying on the vacuum manufacturer’s general furniture label.
Pause after dry cleaning. If the only problem was dust or crumbs, the job may already be finished. Wet cleaning adds drying time and opportunities for residue, so it should solve a remaining problem. Inspect the material under normal light before deciding that a change in sheen needs additional treatment.
Use a small, documented spot treatment
If the applicable guide permits a cleaner, test it on an inconspicuous accessible area without soaking the assembly. Follow both the chair instructions and the cleaner’s use directions. Allow the test area to dry fully before judging color or texture. A surface can appear darker simply because it is damp.
For a fresh liquid spill, absorb what you can with a clean cloth rather than pushing the liquid through the weave. Use a new section of cloth as it becomes wet. Do not rub aggressively in an attempt to make the spot disappear immediately. The aim is to lift contamination while protecting the material and its attachment.
Apply an approved cleaning solution through the cloth when the guide calls for controlled application; do not flood the seat with a spray bottle. If the maker specifies backing support, place the towel as instructed and keep it clean. A towel that is already saturated or dirty stops serving its intended purpose.
Remove residue without soaking the chair
Follow the guide’s rinse or residue-removal instructions using controlled moisture. A rinse on a chair is not automatically a hose rinse. The method must keep water from collecting in the seat filling, hardware recesses, or mechanisms. Use fresh cloth surfaces so you remove cleaner rather than spreading it.
The Steelcase product-cleaning guidance reinforces that cleaners and disinfectants need material-specific approval. Its surface-care instructions should be read with the applicable textile code and product guidance. They are not permission to use a hard-surface disinfectant on an unidentified mesh chair.
If the mesh still feels slick, tacky, or unusually stiff after drying, stop and consult the maker. Repeated application of additional products can make the cause harder to identify. Record which cleaner was used, its dilution if relevant, and the area treated so support can give a specific answer.
Let the entire assembly dry
Leave the chair in a normally ventilated indoor space until the treated areas are fully dry. Check the underside and frame channels as well as the visible top. A dry-looking weave does not prove that adjacent foam or seams are dry. Do not cover the seat with a cushion to make it usable sooner.
Avoid a hair dryer, space heater, or direct intense sunlight as a shortcut unless the manufacturer explicitly specifies such a method. Haworth’s mesh guidance, for example, warns against excessive heat. Heat may alter a material or finish while leaving moisture trapped elsewhere in the assembly.
Drying has no reliable universal timer. The amount of moisture, upholstery construction, airflow, and room conditions all matter. If a cleaning method would require returning a chair to service before it can dry, schedule it differently. In a shared office, label the chair and provide an alternative until the job is complete.
Build this mesh-cleaning log
Use five columns: area, material identification, observed soil, approved method, and dry result. An example entry could read “back panel; original documented mesh; dry dust; upholstery vacuum; clean, unchanged texture.” That entry calls for no stain treatment. Another could record “seat edge; unknown covering; sticky mark; awaiting material identification.”
Add the date and the source of the instructions. This prevents a later cleaner from assuming that a successful wipe on the plastic frame also approved the seat. In a workplace, attach the care record to the chair’s asset number rather than relying on someone remembering which black chair was treated.
Use the log to identify causes. If crumbs repeatedly collect below the seat, vacuuming that area may be more useful than frequent wet treatment. If one cleaner repeatedly leaves residue, stop using it and review its compatibility. The log is a practical troubleshooting tool, not a requirement to clean on a fixed calendar.
Recognize damage that cleaning cannot repair
Frayed attachment edges, broken threads, separated mesh, or a sagging support surface need a service decision. Cleaning cannot retension a structural suspension panel or make a torn seat support intact. Avoid pulling, tightening, or trimming the mesh without model-specific repair instructions.
A persistent mark may also be permanent discoloration or wear rather than removable dirt. Compare photographs taken before and after the area has dried. Once the approved method stops improving the result, more scrubbing can create a larger visibly damaged patch. Ask about professional cleaning or a compatible replacement assembly.
Do not remove the seat or back simply to gain washing access unless the manufacturer provides an appropriate owner procedure. The assembly may contain hidden attachments or adjustments. Keep cleaning separate from disassembly, particularly around the cylinder and recline mechanism.
Make future cleaning easier
Keep an appropriate vacuum tool accessible and deal with spills promptly using the documented method. Avoid eating directly over open mesh if crumbs are the recurring issue. A removable protective cover may change the chair’s fit or ventilation, so check that choice rather than assuming it improves every mesh chair.
For a replacement purchase, ask for the care guide before ordering. Compare whether the seat is open suspension or padded, whether approved stain treatment is practical in your setting, and whether replacement surfaces are supported. Those facts can matter more than the broad word mesh in a product description.
A successful cleaning leaves the mesh intact, the support unchanged, and the whole chair dry and ready for normal use. Stop when that result is achieved. The objective is controlled removal of soil under the manufacturer’s instructions, with enough information recorded to repeat the method accurately next time.
Something unclear or out of date? Send a correction with this article’s title and the detail to check.
Sources, research & corrections policy ↗