Identify an office-chair replacement part by the chair’s model, manufacturing information, configuration, and the exact interface being repaired. A familiar brand name or matching outline is insufficient. The right part should arrive with a clear compatibility statement and an appropriate installation route, not depend on drilling new holes or guessing which fasteners to reuse.
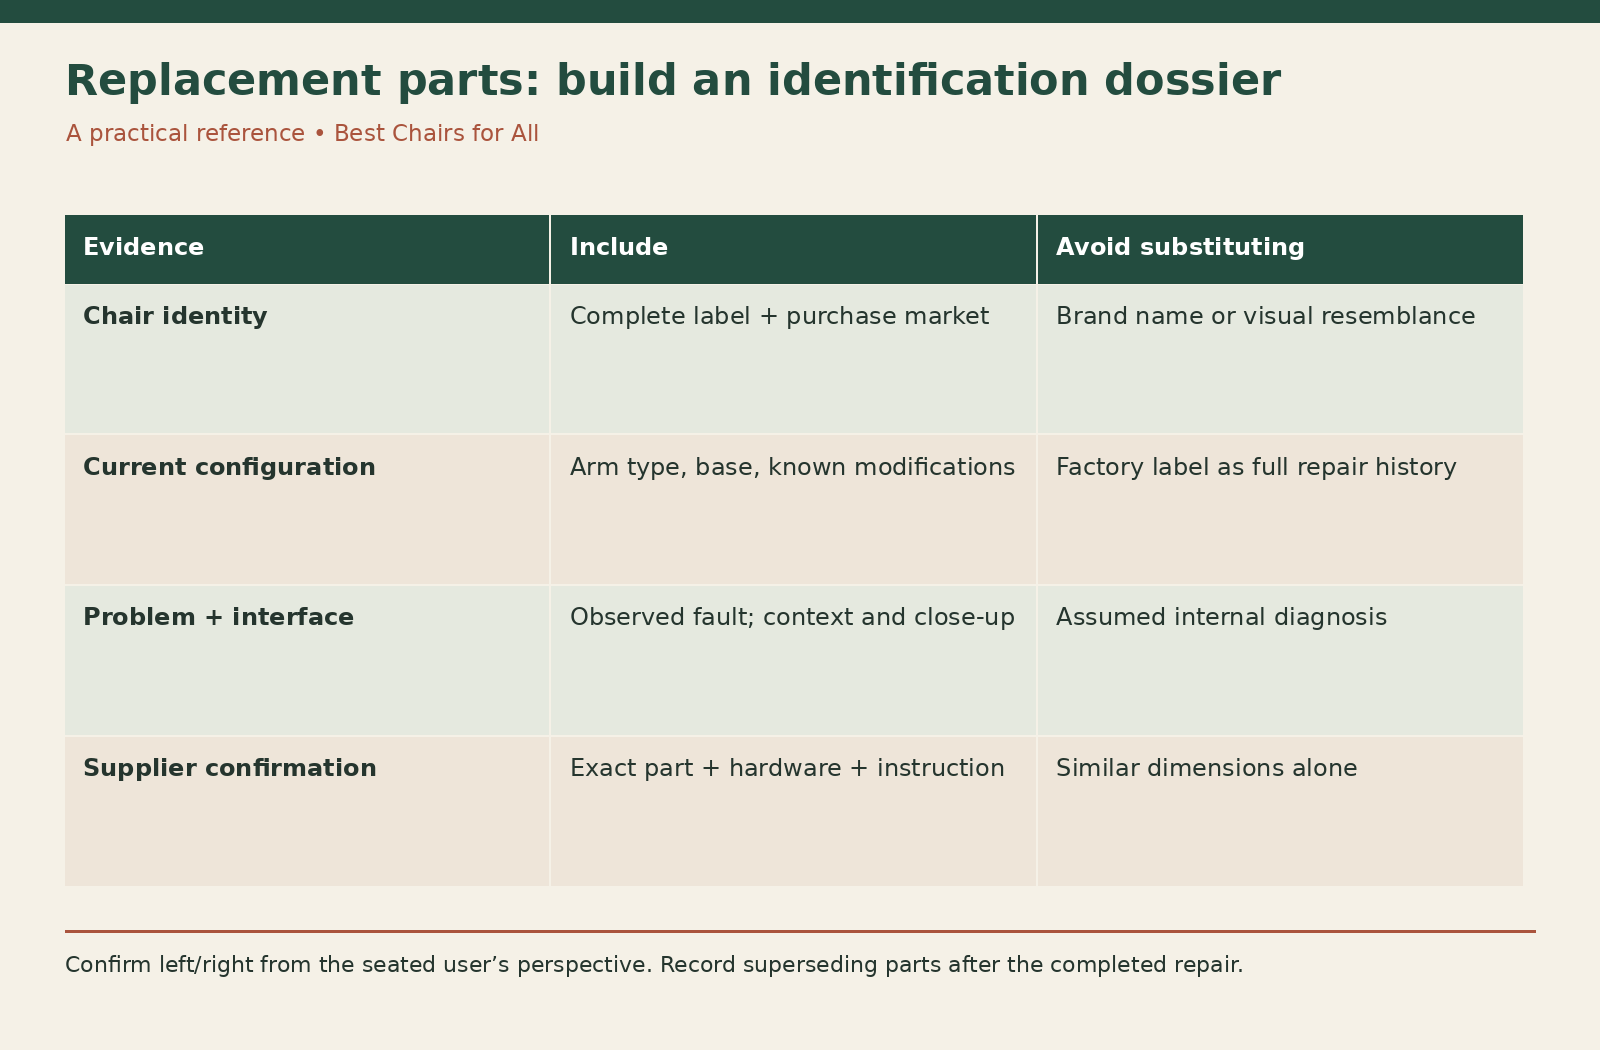
Treat the process as a small identification project before shopping. The parts dossier below gathers the evidence a manufacturer, authorized dealer, or qualified repair provider needs. It also helps you avoid paying for a plausible-looking pad or control when the actual fault lies in a different assembly.
Start with the chair label
Look for the product label under the seat or elsewhere indicated by the manufacturer. Photograph it clearly and keep the original image. Include complete strings of letters and numbers rather than transcribing only the recognizable model name. A configuration code can identify details that the family name omits.
Herman Miller’s service page asks owners for the complete product number, FO number, and manufacturing date, alongside issue photographs. It illustrates that a label is service information, not packaging to remove after purchase. Its label formats vary over time, so compare the relevant example rather than assuming one layout.
If the label is missing or damaged, collect the original receipt, dealer name, purchase date, and any order specification. Ask the manufacturer whether it can identify the configuration from those records. Avoid assigning an exact generation solely from a seller’s estimate of age or a forum photograph.
Describe the failed function before naming the part
Write what happens during normal use. “The arm pad’s coating is peeling” is different from “the arm drops when the height button is released.” One concerns the contact surface; the other may concern the height-adjustment assembly. Buying a new pad will not repair a failed adjustment.
Use neutral descriptions for uncertain areas. Say “seat moves relative to column” rather than declaring that the gas cylinder bearing has failed. A service provider can use an external movement video to identify the relevant interface without you opening the mechanism.
Include any recent changes. A chair that became too tall after a caster swap needs a geometry review, while a chair that gradually loses height has a different symptom. Separating the event and its timing prevents the parts search from being driven by a misleading keyword.
Map the assembly and the interface
Create a simple hierarchy: complete chair, major assembly, replaceable component, mounting hardware. For an arm problem, that could be chair family, left adjustable-arm assembly, arm cap, and cap fastener. The hierarchy keeps a cosmetic replacement separate from a structural replacement.
Photograph the component in place and, where accessible without dismantling, its connection. Include an overall chair image so the recipient sees the context. A tight close-up of one screw can hide whether it attaches a pad, an arm stalk, or the whole arm to the seat.
Do not take apart the chair merely to obtain every possible measurement. Identify which owner access is supported first. Gas-lift and tensioned-mechanism work belongs with the correct service process. A parts specialist should be able to tell you what additional evidence is needed and how to obtain it safely.
Record generation, region, and options
A model family can change during production. Parts may differ by revision, size, manufacturing region, fixed versus adjustable arms, stool versus task height, or upholstery choice. The same current retail name can therefore appear on chairs with different service requirements.
Record the country or market where the chair was purchased as well as where it is now located. Regional product variants and dealer service routes can differ. A part stocked by an overseas seller may not automatically match your local chair even when the product photographs look identical.
Also identify prior modifications. A used chair may have a replacement base or aftermarket arms that no longer match the factory configuration code. Tell the supplier what is documented and what is uncertain. The label remains valuable, but it should be compared with the actual assembly rather than treated as a complete history.
Use the manufacturer parts route first
The Steelcase store FAQ directs owners toward selected service parts and support. That is useful because some replacements are intended for straightforward customer installation while other assemblies require a service conversation. Availability of one owner-installable component does not establish that every internal part is sold or supported the same way.
Ask for the exact replacement identifier and the instruction that applies to your chair. If a part has been superseded, request written confirmation that the newer part replaces your original and whether additional hardware is required. A supersession can be legitimate, but the connection should be explicit.
Keep a dealer quotation with the chair identifier and configuration. A telephone conversation can be helpful, but a written part reference reduces ambiguity when ordering later. It also gives you something concrete to compare with the part and packing slip when the shipment arrives.
Learn from a specific arm-cap example
The Haworth office-chair arm-cap page identifies named chair and arm configurations and provides model-code cues. Its documented fit is more useful than an unqualified description such as fits office chairs. Check the exact option selected rather than assuming every arm from those chair families uses the same cap.
This example also shows why arm type matters. A fixed arm, height-adjustable arm, and multidirectional arm can have different attachment details even on a visually similar chair. The product name identifies a family; the option and installation document identify the actual replacement job.
Do not extend the manufacturer’s list based on a user review saying a cap also fit another model. That can be a lead to ask about, but it is not the same as manufacturer confirmation. A successful fit reported by another owner may involve a different revision or an undocumented compromise.
Measure only what resolves compatibility
For a pad, useful measurements can include mounting-center distances, underside shape, and any keyed features, if accessible under the supported procedure. For casters, stem type, shaft diameter, length, installed height, and brake function matter. Different parts require different measurement sets.
Use units and reference points consistently. “Hole spacing 100 mm center to center” is more useful than “roughly four inches across the bottom.” Include a photograph with the measurement reference visible when practical. Avoid rounding close metric and inch dimensions into an assumed match.
Dimensions alone do not establish compatibility for every component. A seat mechanism can have similar hole spacing but different controls, load ratings, cylinder actuation, or geometry. Get the manufacturer or qualified provider’s confirmation for such assemblies rather than relying on a ruler and a universal listing.
Build a complete parts dossier
Use nine fields: manufacturer and model; label photograph; manufacturing or revision data; current configuration; symptom; component location; interface photographs; relevant measurements; and previous modifications. Add a separate field for the supplier’s confirmed part number and installation route.
For a hypothetical request, write: “Chair family Harbor, label attached, purchased in the US in 2020, adjustable left arm, cap splits but height adjustment holds, original arm assembly, no modifications known.” Attach the whole chair, cap, and accessible underside images. That is enough to start a focused identification discussion without declaring a part interchangeable.
For an uncertain chair, write “label missing; dealer receipt attached; replacement base history unknown.” Do not fill gaps with guessed dates or generations. Good parts identification makes uncertainty visible so the supplier can address it rather than unknowingly relying on a false assumption.
Ask four questions before ordering
First, does the quoted part fit the specific chair and configuration in the dossier? Second, does the quotation include necessary hardware or adapters approved by the manufacturer? Third, who should install it and which instruction applies? Fourth, what are the return conditions if the part is supplied incorrectly or the diagnosis changes?
Distinguish a part-only price from a completed repair. Shipping, inspection, labor, and downtime can matter. A cheap mechanism with no supported installer may be less practical than a complete service quotation. Compare the result you need: a functioning chair with correct geometry, rather than a box containing a similar component.
If warranty coverage might apply, use that process before buying replacements independently. Coverage depends on the applicable terms and purchase history. Do not assume that an old-looking chair is outside coverage or that every secondhand purchase inherits the original purchaser’s benefits.
Inspect delivery before installation
Compare the packing slip and markings with the confirmed identifier. Check left and right from the seated user’s perspective and verify any size or finish option. Do not install a part simply because it is the only one in the shipment if it differs from the quotation.
Photograph damage or mismatched interfaces before removing packaging needed for a return. Keep the old part until the supported repair is complete unless an official remedy gives different instructions. The original can help resolve an unexpected hole pattern, fastener, or installation question.
Stop if the replacement requires unexplained force, leaves a gap, changes the intended control operation, or needs an improvised mounting change. Ask the supplier to review the evidence. A nearly fitting part is a compatibility question to resolve, not a reason to alter the chair until it accepts the part.
Close the record after the repair
Record the installed part number, date, provider, instruction revision, and functional result. Include photographs of the completed assembly if helpful. That new record matters because the chair may now contain a supported superseding component rather than the original factory part.
Verify the function that motivated the repair and the adjacent controls affected by the work. A new pad should remain secure while its intended arm adjustment works; new casters should retain proper height and floor behavior. An unrelated ongoing symptom should be recorded separately rather than counted as a failed cosmetic repair.
Store the dossier with the chair’s receipt and care instructions. The next repair then begins with a documented configuration instead of another round of visual guessing. Accurate identification is what makes repair practical: it connects the observed problem, the supplied component, and the completed result in one traceable record.
Something unclear or out of date? Send a correction with this article’s title and the detail to check.
Sources, research & corrections policy ↗