A loose office-chair armrest needs two checks before tightening: which interface is moving, and whether that movement is part of the arm’s intended adjustment. A pad that slides or pivots can be working correctly. A fixed bracket moving against the seat, a height adjustment that drops, or a cracked arm support needs a different response.
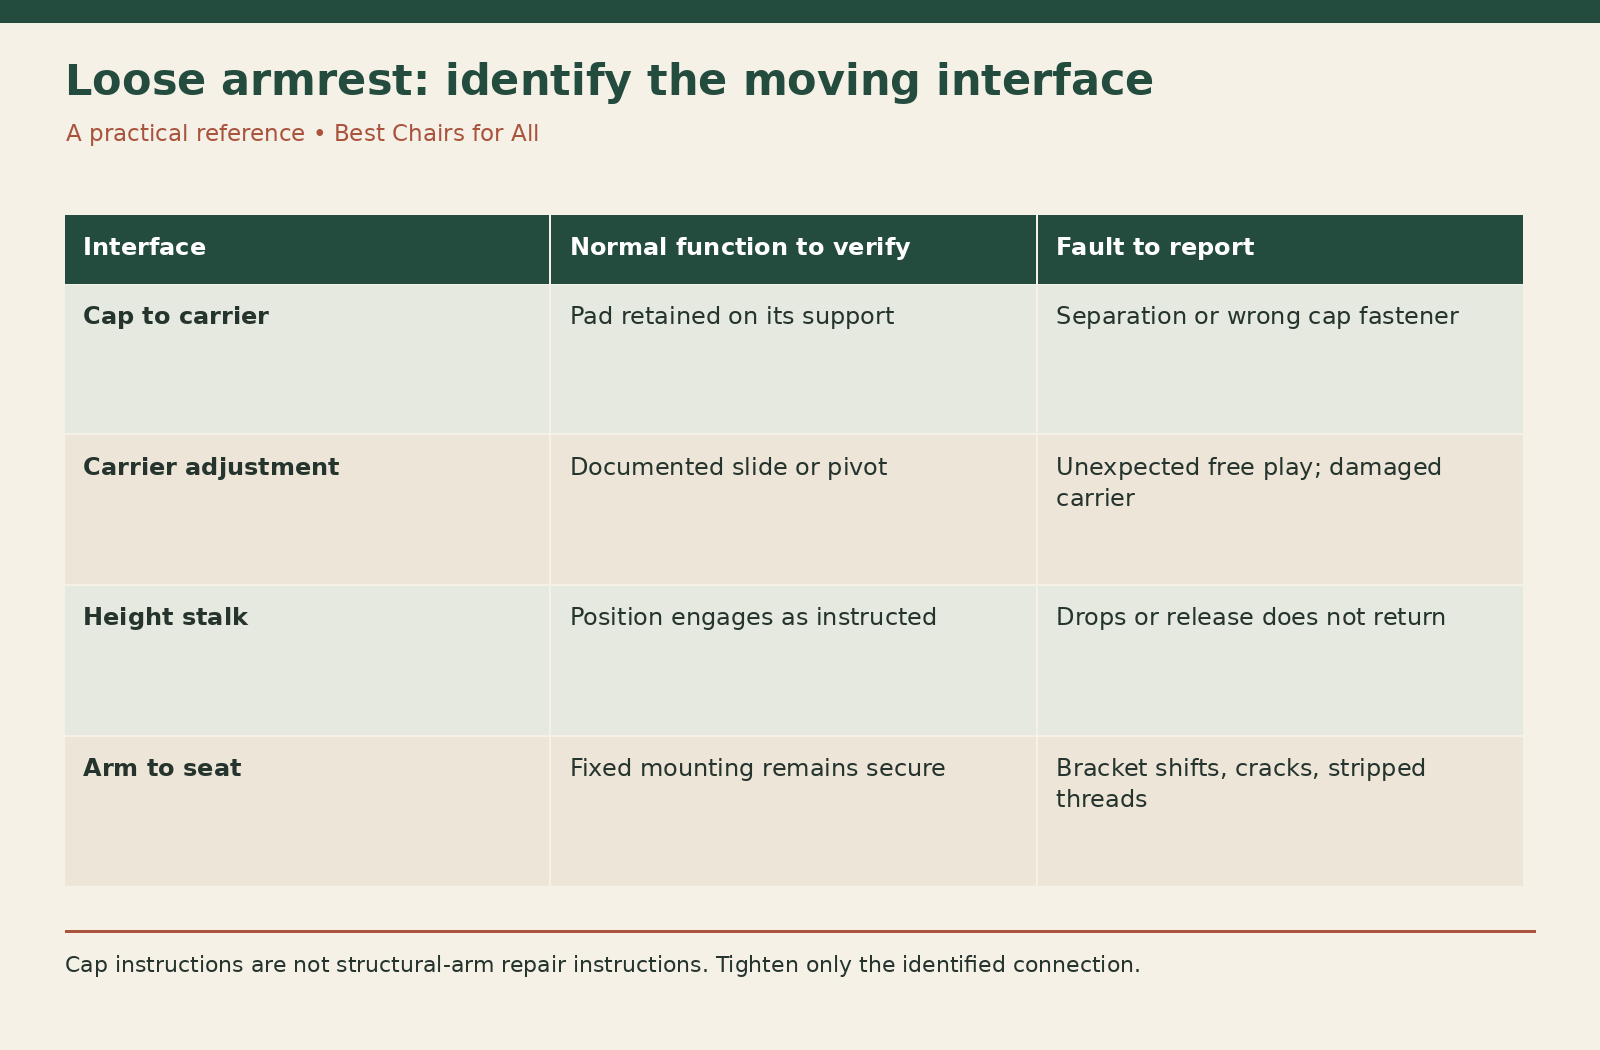
Use the arm-interface map below to distinguish the pad, adjustment carrier, stalk, and seat mounting. Only tighten fasteners identified for the task in the exact product instructions. There is no universal torque or screw location for office-chair arms, and making an adjustable joint completely rigid can damage a function that should remain movable.
Identify the four arm layers
Begin at the top. The pad or cap is the surface under your forearm. Under it may be a sliding or pivoting carrier. The arm stalk can contain the height adjustment. The entire assembly then mounts to the seat or chair frame. Some simpler chairs combine several layers into one fixed part.
Watch the arm while moving it gently within normal use, with the chair unloaded and stable. Ask whether the pad moves on its carrier, the stalk moves within an adjustment, or the whole arm moves at the seat. Keep fingers away from gaps and do not apply your body weight to a suspect arm.
Record left and right from the seated user’s perspective. A close-up labeled only “right side” can be ambiguous if the photographer is standing in front. Clear orientation helps the supplier identify the correct arm, pad, and hardware without another exchange of messages.
Check the adjustment guide first
Find the chair model and arm option. A chair family may offer fixed, height-adjustable, and multidirectional arms. The applicable guide should describe which parts slide, pivot, lift, or lock. Compare that behavior with what you observe before reaching for a screwdriver.
For example, the Steelcase Series 1 specification guide describes arm-cap position adjustments and distinguishes options. Documented side-to-side pad travel is not automatically a loose mounting screw. Ask about unexpected free play separately rather than tightening the adjustment until the cap can no longer move.
A pad that shifts when bumped may still be inconvenient for your task even if it is functioning as designed. Adjustment instructions can help you position it, but they do not create a lock where none is provided. If you need a different retention behavior, ask about supported alternatives instead of gluing or jamming the carrier.
Inspect fixed attachments without loading them
Look for a visible gap at a fixed mounting, missing hardware, a screw backing out, or damage around the attachment. Do not deliberately lean hard on the arm to prove it is loose. If it is cracking, separating, or unable to hold its intended position, stop using the chair until assessed.
Check whether a new problem followed assembly or pad replacement. Compare the relevant instruction step and hardware list. A cap fastener and a structural arm fastener may look alike but serve very different roles. Using the wrong length can prevent proper retention or contact components beneath the mounting.
If a fastener head is inaccessible under a service cover, do not assume the cover should be pried off. Get the matching procedure. Some owner tasks are straightforward; others require different tools, positioning, or trained service. The accessibility of a screw does not establish that it should be tightened.
Read an actual cap-replacement comparison
The Haworth office-chair arm-cap kit instructions separate Fern from Soji, Very, and Zody applications. They show cap removal and replacement and note that the supplied Fern kit can include more screws than the number required for that installation. Follow the named diagram and hardware requirement rather than trying to use every spare screw.
This is a cap procedure. It does not establish how to repair a dropping height mechanism or tighten the whole arm to the seat. The instruction’s value is precisely its limited scope: an identified contact component and the correct connection for that component.
Use a replacement kit’s specified hardware and model applicability. If your chair does not match the diagram or the arm option is different, ask the supplier before proceeding. Do not transfer a fastener pattern from a visually similar arm or improvise a new hole to match a replacement pad.
Tighten only a documented owner-serviceable connection
When the exact instructions identify an accessible mounting fastener for checking or replacement, support the chair as directed and use the specified tool. Seat the tool properly in the fastener head and follow any supplied torque or sequence. Avoid impact drivers and extra leverage unless explicitly required.
There is no useful generic rule to turn every arm screw one additional revolution. The starting condition, thread type, material, and intended clamp load vary. A screw that already holds correctly may be damaged by unnecessary tightening, especially where it engages plastic or a small insert.
Stop if the screw spins without securing, resists abnormally before seating, or begins to strip. Also stop if the parts will not align. Those outcomes can indicate damaged threads, an incorrect screw, or a different assembly fault. They require identification rather than more force.
Treat a dropping height adjustment separately
An arm that releases downward during normal use may have an engagement problem rather than a loose outer screw. Read the exact instructions for raising, lowering, and engaging its height positions. Some mechanisms use a button; others use a different sequence. Do not assume one model’s controls describe another’s.
If the documented adjustment is not holding, record which positions fail and whether the release control returns normally, without forceful trials. Contact support about the relevant arm assembly. A decorative pad replacement will not restore a failed internal height lock.
Do not wedge the release button, tape the stalk, drill a stop hole, or add an improvised bolt to prevent movement. Those modifications alter the assembly and can create sharp edges or unexpected behavior. A supported replacement arm or service repair is the appropriate way to restore the specified function.
Distinguish pad wear from attachment looseness
A soft pad can compress, split, or peel while its mounting remains secure. Cleaning may remove residue but cannot reconnect a torn layer or restore missing material. If the surface is deteriorating, ask whether a compatible cap is available separately from the full arm.
The Haworth arm-cap product page lists particular chair and arm configurations. It is useful evidence for choosing a cap, but do not extend the compatibility list to an unlisted chair without confirmation. Keep the exact model-code information with the order.
An aftermarket cover can make a worn pad feel softer while hiding a loose or damaged mounting. Inspect the underlying component first. If using a supported cover after that check, consider the added thickness and whether it changes working height or reaches the desk edge sooner.
Use the arm-interface worksheet
Make four rows: cap-to-carrier, carrier adjustment, height stalk, and arm-to-seat mounting. In each row, record intended motion from the guide, observed motion, visible condition, and approved next action. Add the chair label and arm option at the top of the sheet.
A hypothetical entry might read “cap slides laterally as documented; no separation; no tightening action.” Another might read “arm-to-seat bracket shifts; visible loose documented assembly bolt; follow model instruction.” A third could say “height position drops; no owner repair identified; request compatible arm assembly.”
These are different findings even when the owner initially calls all of them a wobbly armrest. The worksheet prevents a pad adjustment from being overtightened and keeps a structural fault from being dismissed as normal adjustability. It also lets a repair provider see which interfaces you have already examined.
Check how desk contact contributes
An arm that repeatedly hits the desk can loosen an inappropriate or already compromised connection, but the impact history does not establish the exact cause. Record whether the pad catches the apron while you move closer to the keyboard. Measure both the arm height and the actual clear opening.
Lower or reposition the arm within its supported adjustment range if that improves access. Do not remove a structural arm assembly without confirmation that the chair can be used in that configuration. Some products offer armless versions, but that does not prove every installed arm can simply be omitted.
Our armrest adjustment guide covers working position and desk clearance in more detail. Complete the mechanical assessment first. A better desk position can reduce repeated contact, but it cannot make a cracked bracket intact.
Prepare a specific support request
Send the model label, arm option, left/right identification, whole-chair image, and short external video showing the moving interface. State whether the chair was recently assembled or modified and whether the fastener has already been checked under the instructions.
Ask whether the movement is expected, which component needs replacement if it is not, and which owner procedure is approved. Request any required hardware with the part. A clear answer should distinguish the pad from the adjustment carrier and complete arm assembly.
If the arm has been used to push the chair up a step or carry the whole chair, report that history. Avoid repeating the action during filming. Arms designed to support forearms are not automatically approved lifting handles or handrails, and their suitability for a particular transfer must not be assumed.
Verify retention and normal adjustment
After the supported correction, check the specific fixed connection and operate the intended adjustment according to the guide. The cap should remain properly retained while its designed sliding or pivoting action still works. The height adjustment should engage as specified rather than being held by an improvised external restraint.
If the same fastener loosens again or the fault remains, stop and return to the supplier with the record. Repeated tightening is evidence that the earlier action may not have addressed damaged threads, a worn carrier, or another underlying issue.
Keep the instruction and part identifier with the chair’s records. The next time an arm feels loose, you can compare the actual interface and intended motion instead of repeating a generic tightening routine. Correct operation, secure fixed attachments, and an intact support surface are the useful outcomes.
Something unclear or out of date? Send a correction with this article’s title and the detail to check.
Sources, research & corrections policy ↗