A recliner fits a room only when three separate things fit: its closed body, its full operating movement, and the people moving around it. The upright depth in a product listing answers just the first question. A chair that looks beautifully compact beside a sofa can still block a doorway when its footrest opens.
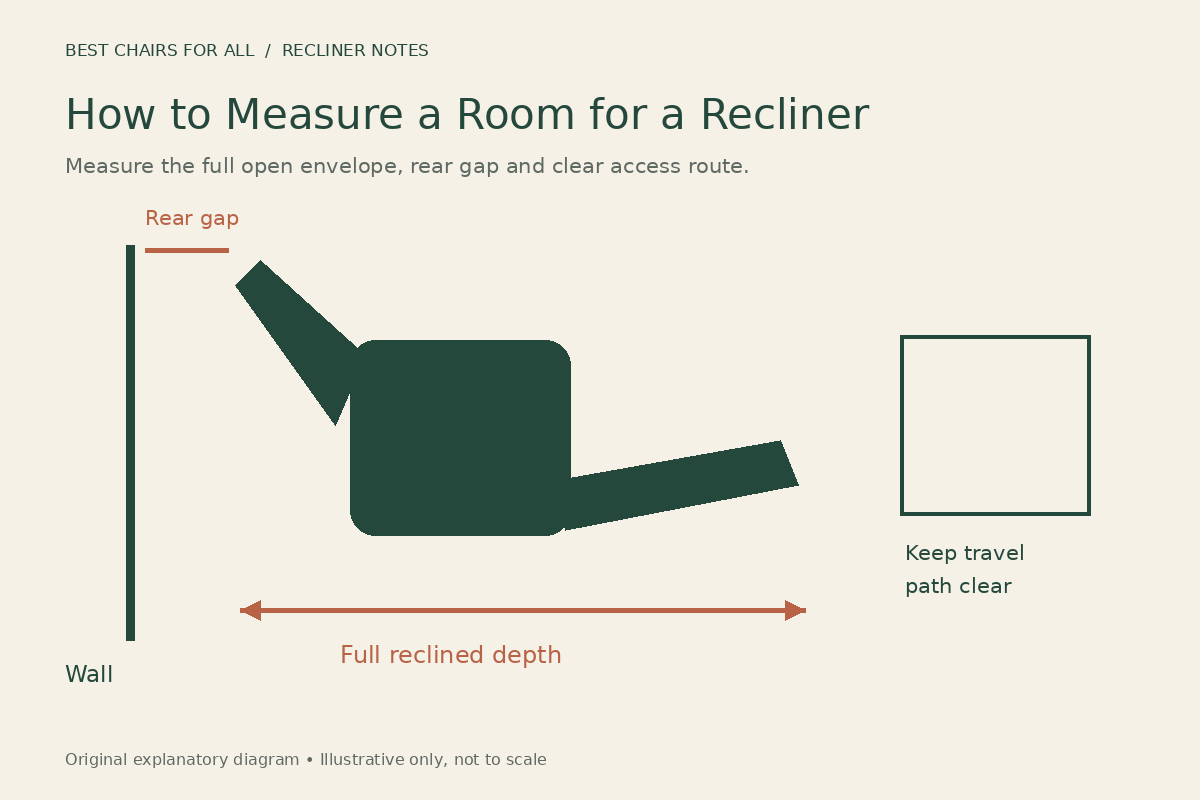
This guide gives you a repeatable way to mark out the actual footprint before ordering. It is a planning method, not a substitute for the manual supplied with a particular chair. Keep every measurement attached to the exact model, mechanism and upholstery configuration you are considering.
Collect five chair measurements before drawing the room
Ask the retailer for overall width, upright depth, fully reclined depth, required clearance behind the chair, and clearance needed beside a handle or moving arm. Also ask what the manufacturer means by each dimension. Fully reclined depth might describe the moving chair from its rearmost to foremost point; a separate placement dimension may describe the distance from the wall to the footrest. Those numbers cannot be added interchangeably.
Record the source and model number beside the figures. If the listing lacks reclined depth, request a dimensional drawing or have the retailer measure a showroom unit. Do not estimate it by adding the length of a visible footrest to upright depth: the seat and back can also translate as the mechanism moves.
The La-Z-Boy Trouper product page notes that upholstery construction can affect dimensions. That is a useful reason to verify your chosen configuration rather than borrowing figures from a similar-looking chair.
| Measurement | What to write down | Why it matters |
|---|---|---|
| Overall width | Widest outside points | Side tables, adjacent seats and access |
| Upright depth | Closed front-to-back body | How the chair sits between uses |
| Reclined envelope | Extreme rear and front positions | Collision-free movement |
| Wall clearance | Manufacturer’s exact definition | Backrest and wall protection |
| Control access | Side space to operate controls | Realistic daily use |
Measure the room from the real obstacles
Use a tape measure, low-tack painter’s tape suitable for your floor, paper and a pencil. Draw the walls first, then place the door swings, fireplace hearth, radiators, vents, outlets, window trim and furniture that will stay. Measure from the obstacle that actually projects furthest. A tall baseboard, curtain fold or projecting sill may meet the moving chair before the wall does.
Walk through the room as it is normally used. Note the route from the door to the sofa, the path to a balcony and the place someone stands to open a cabinet. These practical routes often decide whether a location works more than the total square footage does. Make a second drawing if a coffee table can move, rather than silently assuming it will always be pushed aside.
Label movable and fixed obstacles differently. A small basket is movable; a floor outlet and fireplace clearance are not. If heat-producing equipment is nearby, use its installation instructions as well as the chair’s instructions. A furniture layout should never depend on treating an equipment safety clearance as spare seating space.
Mark the closed footprint first
Tape a rectangle matching the chair’s overall width and upright depth. This is deliberately a bounding box, not a drawing of every curve. Check whether it crowds nearby seats or makes the room feel pinched. Put a dining chair inside the rectangle to approximate where a person will sit, while recognizing that it does not reproduce the recliner’s height, comfort or mechanism.
Open every nearby door fully. Pull drawers out and reach the light switch. Check whether someone can stand beside the taped rectangle to speak to the occupant or help with a dropped object without stepping into the moving mechanism area. If the closed outline already makes the room awkward, switching from manual to electric operation will not solve the space problem.
Add the full movement envelope
Now mark the rearmost and foremost points reached through the full operating cycle. Use the manufacturer’s placement drawing whenever one is available. Include rocking or swiveling movement if the model permits those motions. A swiveling chair can sweep a wider area than its upright width suggests; do not model it as a stationary rectangle unless the instructions require and permit that arrangement.
Some manuals specify a gap that remains when the chair is fully reclined. For example, the La-Z-Boy general operating instructions describe a minimum two-inch gap between the top of the fully reclined back and the wall for the units covered. That is not an instruction to put every upright recliner two inches from the wall. Read the position shown in the diagram and the models covered by the document.
Mark the operating outline with a second tape color. Every place between the closed and open positions belongs to the movement envelope, even if the chair passes through it only briefly. Tables, magazine racks, trailing charging leads and thick rug edges need consideration throughout that movement, not just at the final resting position.
Use a simple front-space calculation
For an illustrative room, suppose the verified distance from the wall to the foremost point of the fully open chair is 69 inches. The near edge of a fixed coffee table is 86 inches from the same wall. The remaining gap is 17 inches. That arithmetic describes a physical gap; it does not establish an adequate walkway or safe operating clearance. Those decisions depend on the manufacturer’s instructions and the people using the room.
The useful equation is: available wall-to-obstacle distance minus verified wall-to-open-chair distance equals the remaining gap. Keep the same starting reference for both measurements. If your product drawing gives only body depth plus a separately defined wall gap, confirm that adding those dimensions actually produces wall-to-front distance before calculating.
Write down both the planned and measured gap after delivery. If the real chair extends further than expected, stop using that layout and reposition it. Compressible cushions and nominal dimensions are reasons to leave planning flexibility; they are not reasons to reduce a manufacturer requirement.
Test access with the footrest open
Leave the full open outline taped on the floor for an evening. Can another person get to the sofa? Can you reach the exit without stepping over the footrest? Can a visitor find a clear route without knowing how the furniture moves? This is an inexpensive way to discover a layout that technically fits but functions badly.
Think about the occupant returning upright as well. The space immediately in front should not become a storage area. A stool or pet bed placed there later can change an originally workable arrangement. Avoid relying on someone remembering to move a table every time the chair is used.
Where accessibility requirements apply, use the relevant local requirements and obtain qualified advice for the actual user. This floor-plan exercise does not establish compliance or assess a person’s transfer needs.
Plan the power route before buying a powered chair
Draw the intended cord route on your plan. The outlet needs to be usable without stretching the lead across a walking route or putting it through moving parts. Include the transformer and any manufacturer-approved battery pack, not just the visible plug. A concealed cable behind the chair can still be pinched during movement.
The La-Z-Boy power-recliner operating manual instructs owners to disconnect powered furniture before moving or cleaning it. Plan a location where that disconnection remains possible. Pushing the plug behind an immovable cabinet makes routine care unnecessarily difficult.
Ask the retailer about the approved power arrangement if the only convenient outlet is too far away. Do not assume an arbitrary extension cord, third-party battery or lead hidden beneath a rug is suitable.
Check the delivery route as a separate project
Room & Board’s measuring-for-delivery guide independently separates the entrance route from the final room layout. It covers door and hallway openings, fixed protrusions, stair landings, and elevator interiors. Use it as a second route checklist, while keeping the recliner manufacturer’s movement and wall-clearance instructions as the authority for operation. Confirm removable parts and the actual delivery procedure with the seller; a general route guide does not establish that a particular recliner can be disassembled.
Measure the narrowest doorway, hallway width, stair turns and landing depth between the delivery entrance and the room. Include door hardware, banisters, ceiling drops and the turn immediately after a doorway. A straight doorway measurement alone says little about whether a bulky chair can turn into the room.
Ask for shipping-carton dimensions and the dimensions of components the delivery team is authorized to remove. Some backs are removable, but that is a model-specific assembly feature rather than permission to dismantle any recliner. Confirm whether assembly, packaging removal and delivery upstairs are included in the service you are buying.
Send photographs and a dimensioned sketch to the seller if a stair or tight turn looks uncertain. Ask what happens if delivery cannot be completed, including any restocking or return transport charges. A room can have ample operating space while the access route still makes a particular purchase impractical.
The final purchase worksheet
Before paying, make one page with the model number, selected cover, verified dimensions, required rear gap, power plan and delivery route. Add the date and the person or document that confirmed missing measurements. This creates a much better decision record than a screenshot showing only the attractive front view.
- The closed chair fits without blocking doors or storage.
- The whole movement envelope remains free of obstacles.
- Daily routes work while the footrest is open.
- Controls, plug and approved power components remain accessible.
- The delivery service has confirmed any uncertain access point.
For a small room, compare the same worksheet for a conventional model and a wall-hugger recliner. The better choice is the one that fits both your body and the room’s operating plan. A smaller rear clearance alone does not prove that the entire chair will use less usable floor space.
Check the plan again after delivery
Ask the delivery team to demonstrate the permitted motion before positioning surrounding furniture. Compare the real open outline with your taped plan and keep the instructions somewhere easy to find. Measure again after adding a thick rug, moving a side table or changing the chair location. A layout is a relationship between several objects, so changing one object can change the result even though the recliner itself is identical. Save a photograph of the successful arrangement with the model information as a practical reference.
Something unclear or out of date? Send a correction with this article’s title and the detail to check.
Sources, research & corrections policy ↗