If gaming chair bolsters dig into your thighs, stop and identify where the contact occurs. The seat may be too narrow through its usable center, too high at the front, too deep for your legs, or poorly matched to your normal sitting position. Raised sides can touch without causing a problem, but uncomfortable pressure is a reason to reassess fit rather than assume the racing-seat shape must be endured.
This guide separates width, height, depth, and task alignment using a contact map. It does not diagnose pain or promise a medical benefit from a different chair. If discomfort persists outside the chair or you have symptoms that need assessment, consult a qualified clinician. For a damaged seat, exposed hard component, or unstable chair, stop use and contact the manufacturer.
First locate the actual contact
Draw a top view of the seat with a front edge and backrest marked. Put a small mark where the bolster touches: near the hips, along the middle of the outer thigh, or close to the front edge. Record whether contact is on both sides or mainly one. Do not press or twist into an uncomfortable position to make the map more exact. Ordinary use provides enough information to begin.
A rear-side contact pattern may point to a narrow or tapered sitting area. A front-side pattern can involve thigh spread, edge height, and how the legs leave the seat. One-sided contact may reflect a rotated task position or asymmetry that needs inspection. These are branches for further checking, not proof of a particular cause. Keep the description factual so the next adjustment tests a clear question.
Razer’s Iskur X master guide describes a chair with angled seat edges and contours. Secretlab’s seat-design explanation describes flared, more gently sloped sides on its pebble base. Those examples demonstrate that gaming-chair side shapes differ. Neither description guarantees the amount of usable room for your thighs, and neither substitutes for a model-specific dimension or trial.
Rule out a rotated setup
Center the chair on the main screen and put the controls within comfortable reach. A mouse far off to one side, keyboard shifted under a monitor stand, or television viewed at an angle can encourage you to rotate the pelvis or spread one leg differently. Notice whether the contact changes when the task is centered. Do not force the knees together to make the bolsters disappear from awareness.
Compare the same ordinary activity after moving only the equipment. If one-sided contact improves when the keyboard comes closer and more central, task alignment contributed. If both sides remain uncomfortable in a centered position, investigate seat geometry next. This sequence prevents buying a wider chair to solve a layout issue that would follow you into the new seat.
Check that the chair stands on an appropriate level surface and that the visible seat is not damaged or obviously skewed. Do not diagnose a bent frame by eye from one tilted photograph. If a new chair looks uneven, send straight-on images of the empty chair to support and explain the contact location. Avoid loosening structural hardware just to make the seat appear level.
Check height and the route of the thighs
Set the chair so your feet have stable support. If the seat is high and the feet hang, the thighs can meet the front edge and side contours differently than when the legs are supported. OSHA’s chair guidance discusses seat height, suitable foot support, and seat-pan fit. Use those broad observations to examine your setup without turning them into a fixed body-angle prescription.
If lowering the chair improves contact but makes the desk too high, the desk-chair relationship needs attention. A suitable stable footrest may allow supported feet at the required desk height. Check whether it crowds the legs or changes the way you enter and leave. Do not rest the feet on caster spokes, loose boxes, or an unstable object to create a temporary result you cannot use safely during normal play.
Record the outcome separately from width. “Front-edge contact reduced with supported feet” is different from “side center still too narrow.” Both can be true. You may improve one contact area and still decide the seat does not fit. Avoid treating a partial improvement as a reason to keep adjusting indefinitely when the remaining limitation is clear and the return window is closing.
Check usable depth before adding padding
Sit with your back supported and observe the space behind the knees. If the front edge reaches into that area, you may slide forward to escape it. Sliding forward can place the thighs on a different, sometimes narrower or steeper part of the bolsters. The resulting side contact can therefore be influenced by depth even when the advertised width seems generous.
A built-in lumbar system or thick separate pillow can move your sitting position forward. Compare only permitted adjustments and accessories, one at a time. Reducing excessive lumbar projection may restore some usable depth, but it does not enlarge the seat or flatten its sides. Do not remove essential padding or seat structure to gain room. Document where your back contacts and where the thigh contact occurs in each configuration.
If the chair has an actual seat-depth adjustment, use its official instructions and confirm it locks correctly. Many racing-style gaming chairs do not offer that feature. A backrest recline lever is not a substitute for a sliding seat pan. Choosing a larger size to gain width can increase depth further, so compare the whole geometry before assuming that XL is the automatic solution.
Measure width at the contact location
Ask for the distance between the beginnings of the raised bolsters at the position marked on your map. A maximum front width, total seat width including sides, or outside arm width does not answer that question. Use the manufacturer’s diagram and request clarification when the arrows are ambiguous. Keep the measurement location visible in a sketch or photograph so another chair can be compared on the same basis.
For an illustrative example, imagine a seat with a 52 cm total upholstered width but a 43 cm central area at mid-thigh. Your comfortable reference-seat footprint at that point is 46 cm. The center is 3 cm narrower than that footprint, even though the headline number is 6 cm larger. These hypothetical figures illustrate why outer dimensions can mislead; they are not a universal fit standard or a named chair’s specification.
A second hypothetical candidate offers a 47 cm center at the same location but has a longer front-to-back cushion. It may improve width while worsening knee clearance. The comparison needs both columns. Record unknown dimensions honestly rather than estimating from promotional photographs. A seller who cannot provide the relevant geometry leaves uncertainty that should be reflected in your purchase and return planning.
Use a four-branch fit record
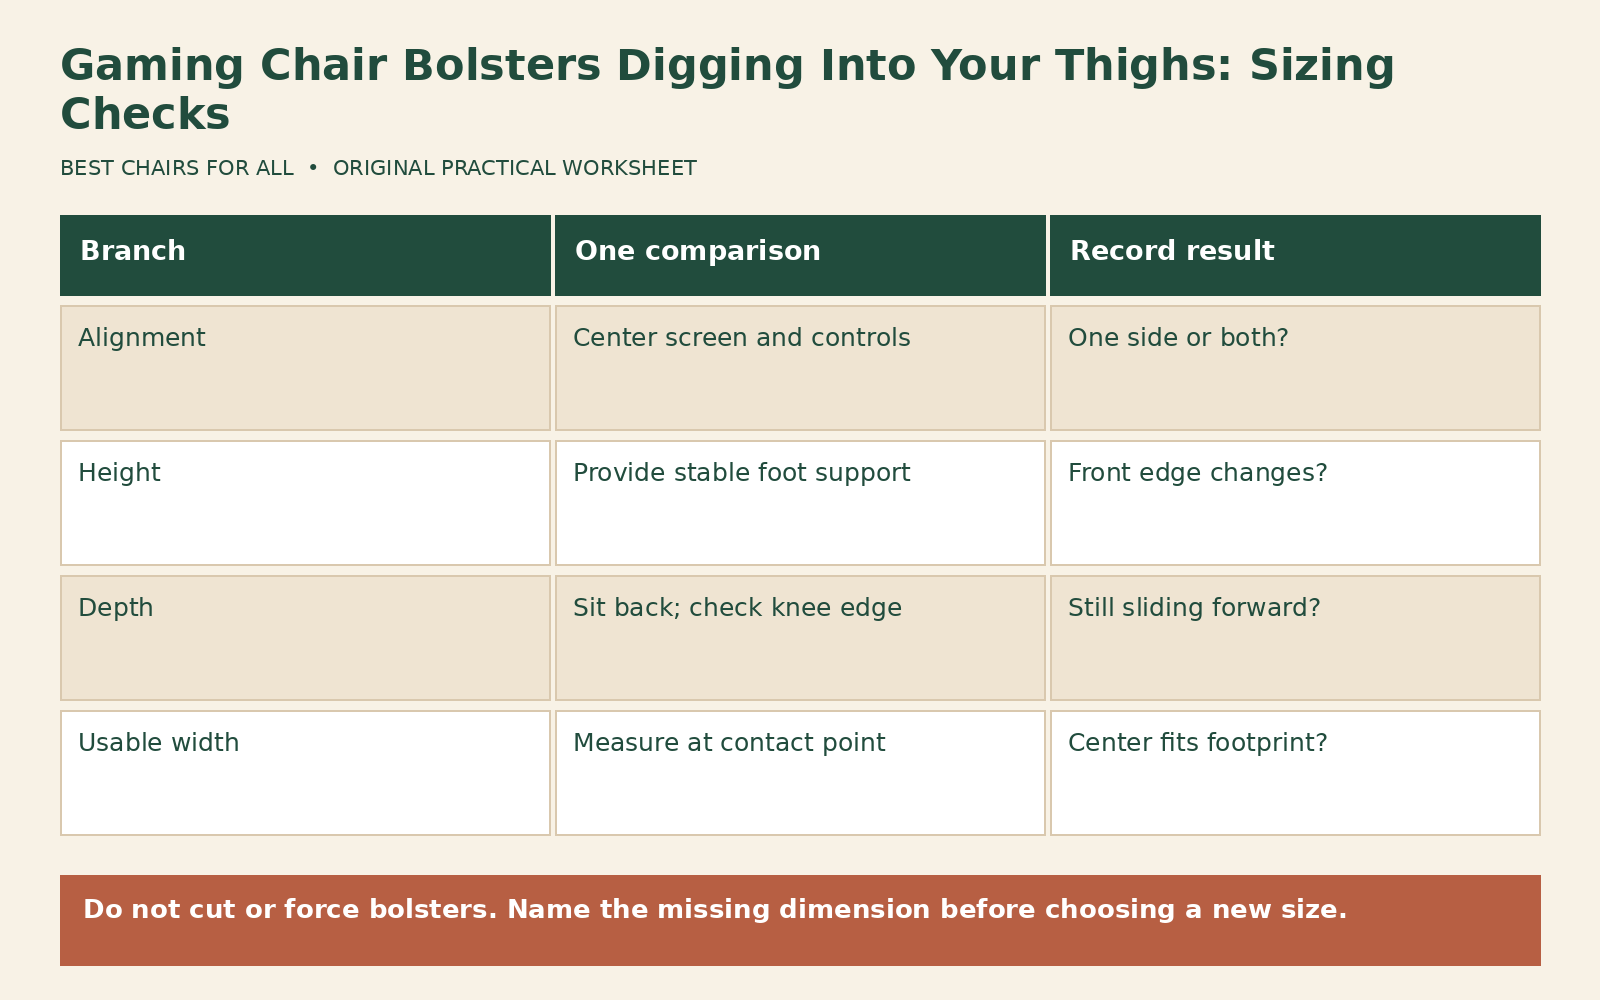
Create branches labeled alignment, height, depth, and usable width. Under each, write the initial observation, one permitted change, and the result. For alignment, test a centered task. For height, test supported feet. For depth, test sitting back with appropriate knee clearance. For width, compare the contact location against documented central dimensions. End each branch with “resolved,” “partly improved,” or “still unsuitable.”
A worked example might read: alignment centered, no change; feet supported, front edge better; lumbar reduced slightly, back contact better; mid-thigh side pressure remains. That record supports a conclusion that the remaining issue is seat shape or width rather than an untested height adjustment. Another user might find that centering a side-mounted monitor removes one-sided contact without any chair change. The same complaint can lead to different practical outcomes.
Keep the record brief enough to share with the seller. A photo of the empty seat with the contact area indicated and a short list of tested settings is usually clearer than a long paragraph about every gaming session. Do not include unnecessary personal measurements. Ask whether the observed contour and usable width are normal for the exact size and whether an approved alternative exists.
Do not flatten the bolsters yourself
Cutting foam, bending side structure, jumping on the edges, or forcing upholstery downward can damage the chair and affect warranty coverage. It can also expose harder parts and create a worse contact surface. Do not treat a side bolster as decorative simply because the fabric feels soft. The construction beneath it is not established by an exterior photograph.
A thick cushion placed above the bolsters changes the seating geometry rather than making the original seat wider. It can raise you above the useful backrest support, reduce knee clearance at the desk, and change armrest height. If considering a manufacturer-approved cushion, evaluate all those dimensions and secure placement. Do not stack loose cushions to achieve a temporary escape from the sides during a return evaluation.
An added cover can also change friction and thickness without altering the underlying slope. It may protect a surface but cannot be assumed to remove uncomfortable pressure. Before buying an accessory, name the exact change you need and ask whether it is designed to provide it on your model. A vague promise of universal comfort is not evidence that it corrects a narrow central seat area.
Make the next-chair requirement precise
If the chair remains unsuitable, record the minimum usable center width you need at the contact location, the maximum depth that works, and the armrest spacing you can reach. Include the supported seat height and desk opening. These requirements are more useful than a general label such as wide, big-and-tall, or ergonomic. Verify dimensions on the next model before purchase where possible.
Keep packaging and ask about returns while the eligibility window remains open. A support ticket does not necessarily extend that window, and an accessory purchase can consume time without resolving the original fit. The final decision should follow the contact map: retain a setup that becomes comfortable through approved adjustments, seek inspection for an abnormal condition, or return a shape that does not fit. Bolsters should accommodate ordinary sitting, not require you to hold your legs in an uncomfortable position.
Something unclear or out of date? Send a correction with this article’s title and the detail to check.
Sources, research & corrections policy ↗