A chair can fit your body and still fail at your desk. Its arms hit the apron, the base catches a cabinet, or a keyboard tray leaves too little room for your thighs. Before buying a narrower chair or raising the seat, measure the places where the two pieces of furniture actually meet.
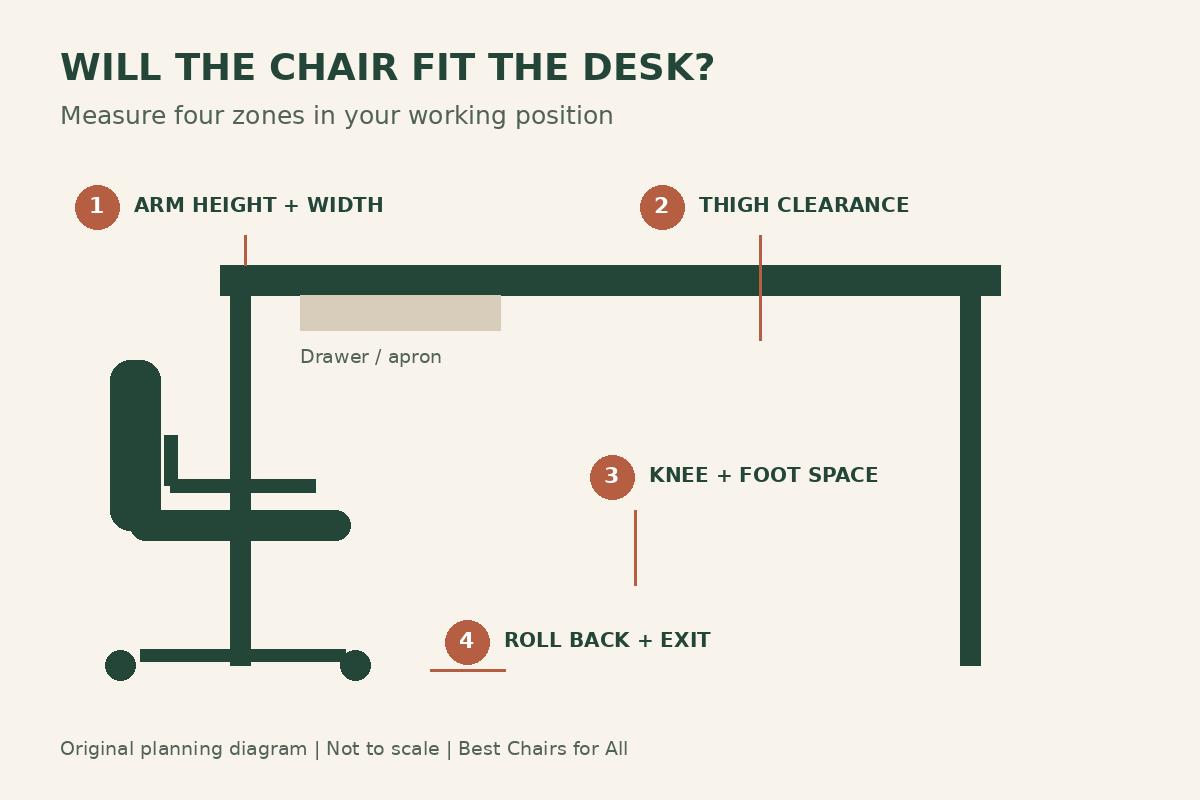
The useful question is not simply whether the chair slides under the desktop. It is whether you can work close to the keyboard, move your legs, change position, and leave the desk without navigating an obstacle course. This guide provides a measurement worksheet and a troubleshooting sequence for those separate requirements.
Our method combines published workstation guidance with an original compatibility worksheet. It is a planning tool, not a clinical assessment, and we have not physically tested the furniture in your room. If discomfort persists after reasonable setup changes, seek an individual workstation assessment rather than buying accessories at random.
Start with the working position, then measure the furniture
Do not start by lowering the chair until its arm pads disappear under the desk. That may solve storage while creating a poor keyboard position. First sit with your back supported and place your hands where you actually type. Notice whether the desk requires you to lift your shoulders or reach forward.
OSHA’s keyboard guidance places the keyboard approximately at elbow height, with relaxed shoulders and elbows near the body. It also warns that a tray must provide adequate leg clearance and room for the keyboard and pointing device. Those are the functional checks; the furniture dimensions are a way of finding out whether they are possible.
For a fixed desk, you may need a higher chair setting to reach that working height. If the floor then becomes unreachable, foot support becomes part of the arrangement. For an adjustable desk, test lowering the surface before adding another item beneath it. Record the configuration you intend to use, not the chair’s lowest showroom setting.
Use a four-zone clearance check
Divide the setup into four zones: arms at the front edge, thighs below the work surface, knees and feet farther underneath, and the chair’s movement behind you. A pass in one zone does not prove a pass in another. A broad tabletop can conceal a narrow frame, and a generous knee opening can still have a crossbar exactly where your shoes need to go.
| Zone | Measure or observe | Common hidden obstruction |
|---|---|---|
| Arms | Arm-pad height and width in your working setting | Apron, drawer, or tray hardware |
| Thighs | Usable height above your seated legs | Center drawer or underside frame |
| Knees and feet | Clear width and depth at both levels | Pedestal, modesty panel, or stored equipment |
| Movement | Roll-back, swivel, and exit path | Wall, rug edge, chair mat, or nearby cabinet |
OSHA’s desk guidance treats the area below the desk as working space and advises keeping it free of objects that restrict the legs and feet. A computer tower that fits neatly beside your knee can still remove the alternative position you need later in the day.
Measure the lowest underside point
Measure from the floor to the lowest obstruction across the area your body and chair enter. Include the apron, drawer handle, adjustment crank, cable basket, keyboard tray bracket, and crossmember. Measuring only to the bottom of the tabletop produces an optimistic number when another component sits lower.
Repeat the measurement at the center and both sides. On a sit-stand desk, repeat it at your seated working height. If the floor slopes or a thick rug covers only part of the chair’s path, measure from the surface where the casters will rest. The relevant reference is the chair’s actual floor level.
Next measure your arm-pad height from that same floor while seated at the intended setting. Note the front and back edges of a sloping pad. Write down whether it retracts, pivots, or lowers without tools. A single advertised arm height range does not explain how much of the pad will remain in front of the backrest when you approach the desk.
Compare usable widths rather than overall widths
A desk advertised as 48 inches wide may have much less space between a drawer pedestal and the opposite leg. Measure the clear opening at arm-pad level and lower down at the base. The chair’s overall arm width and caster-base diameter are different constraints.
Check the narrowest point along the entry path. A chair might fit between two legs when facing straight ahead but catch one during a normal turn. If the desk has angled supports, measure where the front casters will go rather than only at the front edge.
For an online purchase, ask the seller for the maximum outside arm-pad width and the base diameter if they are missing. Do not substitute seat width for either number. Seat width helps assess the space for the sitter; it does not establish clearance for the chair’s outer components.
Use published dimensions as a screening reference
OSHA’s workspace clearance reference includes one method with minimums of 20 inches in width, 17 inches of depth at knee level, and 24 inches at foot level. The page explains the population and seated positions behind its examples. These are screening dimensions from that specific method, not a promise that every person or chair will fit.
A practical comparison therefore needs two checks: the published reference and your own movement. If the dimensions look sufficient but you cannot turn your feet, reach the mouse comfortably, or sit without contact beneath the desk, record that failure. A favorable tape-measure result does not cancel the actual collision.
Likewise, avoid treating a small gap above the arm pads as a universal allowance. Cushion compression, arm-pad slope, uneven floors, and your chosen seat height change the result. Measure with the chair occupied when possible and leave room for ordinary movement rather than aiming for a barely touching fit.
Run a movement test with the chair occupied
Put everyday equipment where you normally use it. Then perform five simple tasks: type a short paragraph, use the mouse at the far side of its normal area, reach a frequently used item, lean back within the chair’s intended adjustment range, and stand up. Stop if something catches or feels unstable.
Make a note of the exact event. “The right pad catches the drawer when I reach for the mouse” is more useful than “the chair is too big.” The former points toward a local clearance problem; the latter can send you shopping for a narrower seat you do not actually need.
The HSE workstation checklist specifically notes that chair arms can prevent a user from getting close enough to equipment. It also calls for room to change position. Use those observations to assess the working setup, not just the photograph it presents when everything is tucked away.
A worksheet for comparing a new chair with your desk
Copy the following fields into a note before browsing. Add units beside every measurement and identify whether a value came from your room, a published specification, or a seller’s reply. That prevents an estimated number from becoming an assumed fact later.
- Desk: lowest underside height at the seated working setting.
- Desk: narrowest opening at arm level and caster level.
- Desk: unobstructed depth at knees and at feet.
- Chair: occupied seat height in the intended configuration.
- Chair: outer arm-pad width and height at that setting.
- Chair: base diameter and normal swivel footprint.
- Room: clear roll-back distance and a usable exit path.
- Unresolved detail: the dimension or adjustment the seller must confirm.
For example, suppose your underside opening measures 26 inches high and an occupied chair’s arm pad measures 26.5 inches at your preferred working setting. These hypothetical numbers identify an interference before purchase. They do not tell you to lower the seat by half an inch: first check whether the pad itself lowers or retracts without compromising your arm position.
Choose the fix that addresses the obstruction
If the arms hit first: try the documented arm adjustments while preserving a comfortable seated position. Shorter or retracting pads may help. Removal is an option only when the manufacturer allows it and you can still work comfortably; do not assume every arm assembly is optional.
If a drawer reduces thigh clearance: examine whether it is designed to be removed and whether doing so preserves the desk’s structure. A keyboard tray may lower the input surface, but its brackets can create a new obstruction. Compare its underside dimensions before ordering.
If a rear panel blocks your feet: relocating loose storage may solve the problem. A fixed structural panel needs a different response, such as moving to another section of the desk or choosing a different desk. Cutting furniture without understanding its construction is not a routine adjustment.
If the seat must rise for typing: verify headroom for your thighs and consider stable foot support. If raising the chair makes the thighs contact the underside, there is a height conflict that a footrest alone cannot solve. Changing the input height or work surface may be necessary.
Handle special desk layouts separately
Corner desks can make a comfortable straight approach difficult even when the desk is large. Test the actual section where the keyboard will sit. A deep corner may invite you to place the monitor far back and the keyboard out of reach; a shallow corner can restrict the space for both arm pads.
For a pedestal desk, compare the base diameter against both the front opening and the path around the pedestal. For a wall-mounted desktop, include brackets in the knee map. For a keyboard tray, check the occupied chair position with the tray extended, because its working position can move you farther into the room.
On a shared desk, repeat the worksheet for each regular user. Label useful settings on a note rather than assuming one height serves everyone. Differences in proportion, keyboard choice, and footwear can matter even when two users have similar overall height.
Check storage fit after working fit
Only after the working setup succeeds should you test how neatly the chair stores. If lowering the arms for storage is easy and allowed, it may be an acceptable daily step. If storage requires repeatedly changing several carefully fitted controls, consider whether you will actually maintain that routine.
Do not wedge the chair beneath a surface to hold it in place. Leave a clear route for cables and avoid trapping a power lead between the chair back and desk edge. A tidy room should still let you pull out, turn, and stand without catching nearby objects.
Before purchasing, keep the worksheet alongside the seller’s return terms. Unconfirmed dimensions are a reason to ask a precise question or choose a seller with a workable trial process. The aim is a documented match between person, chair, desk, and room—one you can evaluate with measurements and ordinary tasks before committing to the furniture.
Something unclear or out of date? Send a correction with this article’s title and the detail to check.
Sources, research & corrections policy ↗