Choose chairs for a pedestal table by checking the base where the user’s feet and chair legs actually go. Removing corner legs can create useful placement flexibility, but a pedestal still has a column, a floor base, and often mounting structure beneath the top. Measure those elements along with the chair. The best match allows a comfortable eating position and normal entry without resting chair feet partly on the table base.
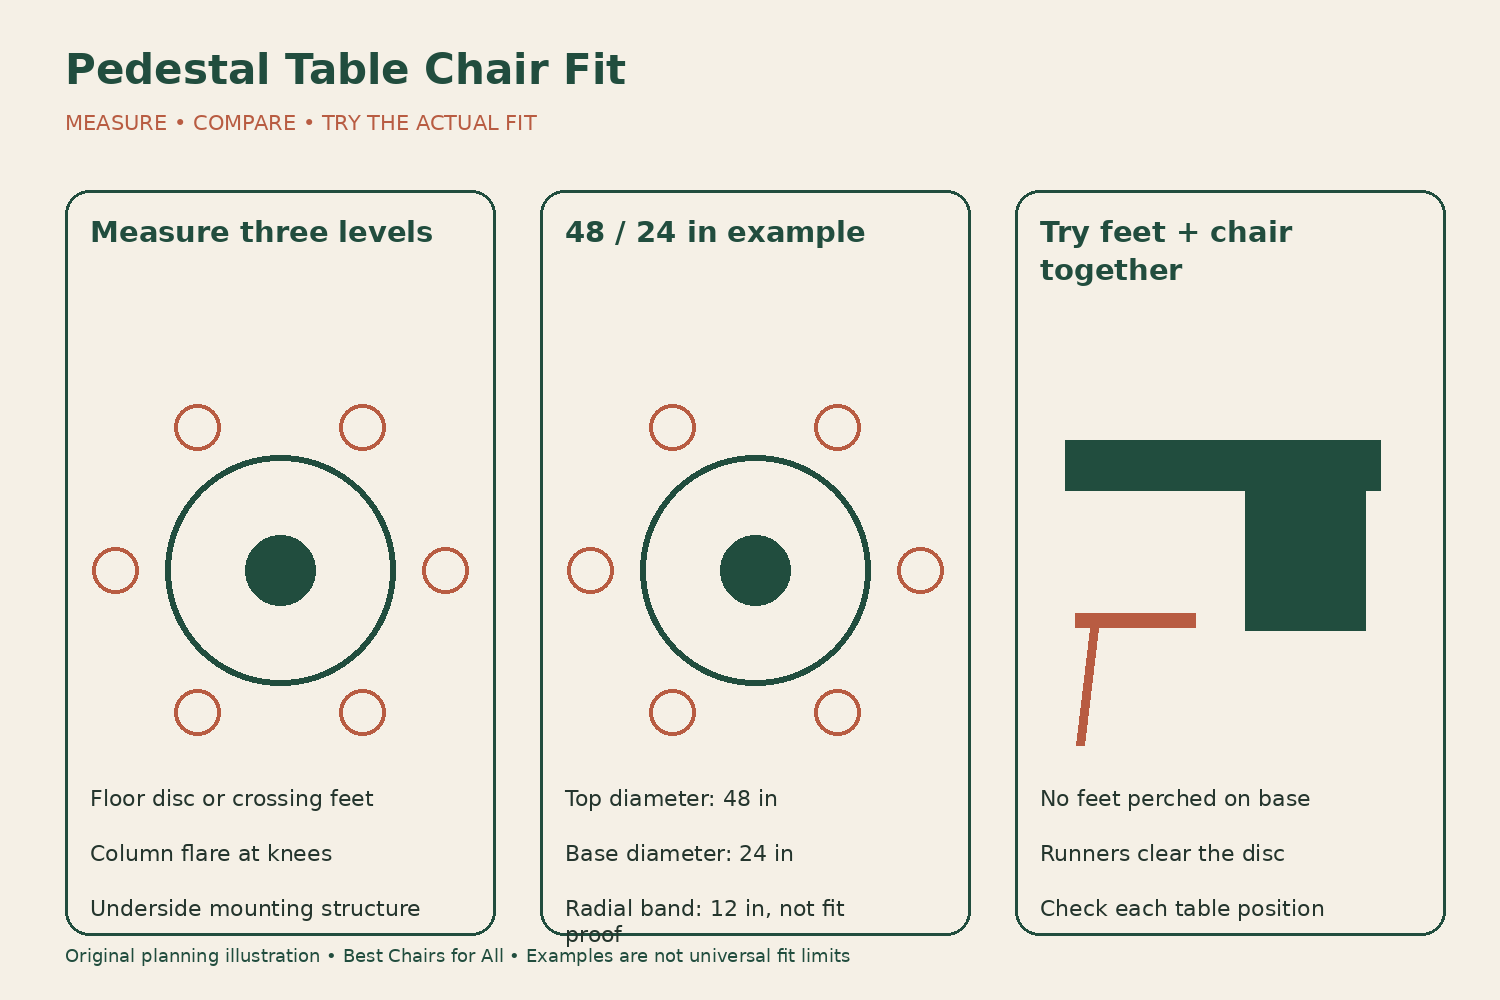
Draw the pedestal in plan and section
A top view shows the tabletop outline, central column, and floor base. A side view shows table height, underside obstruction, column flare, and base height. Draw both, even simply. A broad disc, crossing feet, twin pedestals, and a sculptural solid base create different fitting problems despite sharing the word pedestal.
Measure the table’s maximum top dimensions, height to the eating surface, and height to its lowest underside obstruction. Then record the base’s width, depth, and shape at floor level. If it rises or flares, note that profile too. A chair leg can clear the base’s outer outline at one height and contact it at another.
Do not infer base dimensions from the tabletop diameter or a photograph. A narrow-looking column may sit on a wide support, while a substantial top may use another arrangement. Ask for a dimensional drawing of the exact size and finish version. Changes in table size can change the base as well as the top.
Use product dimensions as examples, not universal rules
The Knoll Saarinen round dining-table page lists dimensions by configuration, including tabletop size, height, and base diameter. This is the kind of information needed for pairing. Confirm the selected variant, since one family page can include several sizes and materials with different fields.
The IKEA DOCKSTA dining-table listing identifies a 40½-inch diameter and 29½-inch height with seating for four. Its top dimensions alone do not provide every foot-clearance detail. Use the drawing, actual table, or manufacturer clarification to complete the floor-base record before choosing a chair with a deep or unusual frame.
These examples are documented tables, not a recommendation to use one prescribed chair style with them. A visually matching tulip chair, wood side chair, or upholstered armchair can each succeed or fail depending on dimensions. The shared pedestal silhouette does not establish the sitting relationship.
Calculate the radial floor opening carefully
For a hypothetical centered round table with a 48-inch top and a 24-inch floor disc, subtract the diameters and divide by two. The result is a 12-inch radial band from the tabletop edge inward to the disc edge. This is a plan-view geometry value, not a guarantee of 12 inches of usable knee or foot room.
The column may flare above the floor, the disc may rise, and a person’s feet do not necessarily stay directly beneath the table edge. A chair’s front legs or runner may project into that band as the chair approaches. Keep the calculation as a screening aid, then test the actual foot and frame positions.
If the base is not round, use the relevant outline rather than forcing it into a diameter calculation. Cross feet create open and obstructed sectors. An oval top over twin pedestals creates different zones along its length. Draw the chair positions in relation to those zones instead of distributing them by tabletop length alone.
Try the chair’s front frame near the base
Measure the chair’s overall footprint, including splayed front legs, a cantilever runner, or a central swivel base. Place the empty chair in the intended dining position and check where its contact points sit. Avoid positioning a chair foot partly on a pedestal disc or a raised support merely to push the seat farther inward.
For a sled or cantilever chair, inspect the whole runner path. A horizontal frame can contact a pedestal earlier than separate legs would. For a central-base chair, compare both floor bases and allow normal movement between them. Two clean-looking pedestal forms can compete for the same area under the table.
Do not remove table-base covers, shorten chair legs, or alter a runner to improve fit. Those are structural or product-design changes outside a normal pairing task. If the intended position requires modification, choose another chair or ask the relevant manufacturer about an approved alternative.
Check where the user’s feet rest
Sit normally at the table with usual footwear and feet supported. Notice whether the pedestal forces the feet outward, backward, or onto a raised edge. A person may find one position comfortable and another awkward. Record the actual experience instead of assuming every diner can use the open sector between base feet in the same way.
Try the normal movements of eating and leaving the chair. Knees may clear the column while toes encounter the floor base. Conversely, the feet may fit while a flared column restricts knees. These are separate height zones, which is why the side-profile drawing matters as well as the floor plan.
If a person has particular mobility, seating, or transfer needs, obtain suitable individual advice. An absence of table legs at the corners is not an accessibility certification. A professional may need to assess the complete table approach and chair arrangement rather than one isolated clearance.
Keep the vertical relationship in the worksheet
Measure from the occupied seat to the table surface and to the underside obstruction. A pedestal table may still have a mounting plate or apron. A chair that slides under an open-looking top can place the thighs too close to hidden structure. Transparency, a thin edge, or a central support does not establish the usable vertical opening.
For arms, compare the highest point along their full path beneath or beside the edge. A curved arm can pass at one position and contact the table as the chair turns. Test gently without impact. If the arms stop outside the edge, check eating reach at that setback instead of assuming the chair is unsuitable or suitable solely from storage appearance.
A padded seat may settle under the user, altering the occupied relationship. Do not subtract a guessed compression figure from the listing. Try the complete chair, including any permitted pad, and keep the configuration recorded so a later cushion change does not silently alter the fit.
Use placement flexibility deliberately
Room & Board’s table finder notes that base and leg placement can affect seating capacity. A pedestal can make it easier to shift chair positions, but the resulting layout still needs elbow room, place-setting space, and independent entry. Flexibility is useful when it produces better positions, not merely a larger advertised count.
At a round table, check how chair fronts and knees converge inward. At an oval table with two pedestals, test end places and the positions directly beside the supports separately. A comfortable position in the middle of one open span does not establish the fit of every place around the table.
For a mixed set, place the widest chairs where they actually work and test their neighbors. Equal visual spacing may not be the best use of an irregular base. Keep the arrangement understandable so chairs do not migrate into obstructed positions when the room is reset after cleaning.
Include swivel and pullout routes
A swivel chair can turn its upper shell while the base stays near the pedestal. Check the arm and back envelope as well as the floor bases. Confirm rotation limits and return behavior for the exact variant. A return mechanism does not pull the chair into the correct location or prevent contact with the table.
A fixed chair must move through the opening used to sit and stand. Test that path without dragging it across the pedestal or lifting by a delicate back component. Follow handling instructions and use suitable floor protectors. If the table is heavy or the top is unattached, do not move it casually to make one trial easier.
Assess the room behind occupied chairs and the route around the whole table. A pedestal may reduce corner-leg interference while leaving the same chair projection into the room. Check nearby doors and storage with people seated so the tabletop’s clean outline does not disguise a circulation problem.
Build a base-clearance trial sheet
Record top size, surface height, underside height, floor-base outline, base height, and column flare. For each chair, record seat height, usable depth, arm height, overall footprint, and moving envelope if applicable. Sketch normal foot positions and the chair’s intended approach.
Add specific observations: front legs remain on the floor, runners clear the disc, feet have a comfortable place, knees clear the column, and eating reach is suitable. These are useful categories, not universal numerical thresholds. Note which user and table position were tried and preserve any unresolved questions for the manufacturer.
Compare two chair styles at the same position if the base is restrictive. A separate-leg frame may clear where a runner does not, or the reverse may be true for another design. Let the actual geometry decide. A style label cannot predict how two particular bases will interact.
Preserve the successful orientation
If a cross-shaped or irregular pedestal works only at certain chair positions, mark that arrangement on the plan relative to a fixed room feature. Rotating the table or moving chairs can change the fit without changing any product dimensions. Recheck after rearrangement rather than assuming a successful trial permanently applies to every orientation.
Confirm the exact table size and chair variant before ordering, and retain the drawings with the receipt. The useful pairing is one in which the base leaves a workable position for feet and furniture, the seat relates well to the surface, and the whole route in and out remains comfortable. A pedestal creates opportunities; careful measurement determines which ones are real.
Something unclear or out of date? Send a correction with this article’s title and the detail to check.
Sources, research & corrections policy ↗